
Lesson Five: Marble Pattern Printmaking
I came across a picture the other day that said "creative minds are rarely tidy" and that definitely proved to be the theme of this lesson. One of the Visual Arts standards that we've been focusing on these past couple of weeks is experimenting with different art tools and mediums. For today's project, we used shaving cream and popsicle sticks as our mediums to make marble pattern prints.
 We started by talking about the word 'marble'. Where have we heard it before? What does marble look like? How is it made? I showed some example of marble rock pattern and then some marbling pattern as recreated using different art mediums. I introduced the term "printmaking" and we discussed what it was. Printmaking is where you transfer pictures, patterns or designs from one place to another. For example, ink stamps are a type of printmaking because you are using the rubber stamp pattern and ink to transfer an image to a paper. I explained that today we will be creating our own marbling patterns using printmaking. Our method of printmaking is mixing food coloring into shaving cream and then transferring those patterns to small pieces of paper. We watched a short video that gave a quick example of what our project would look like.
Because I knew this project had the potential get super messy really quickly, I wanted to make sure to break up the process into steps that could be followed one at a time as a whole class. As we were watching the video in class, I realized we could even write our steps on the board so the students have a visual of what to follow. (This step isn't included in my lesson plan- it was a day-of accommodation!) I asked students to remember what they saw in the video and list the steps they completed the project in. The list we came up with was:
 5. Scrape extra shaving cream off (and back into the tray).
Then, I had the students come up to the carpet to watch me model the project. This way, they could understand how we would follow the steps using the tools we had (which were a little different from that of the video). First I showed them the shaving cream tray, added drops to it, mixed the color in to make a marble pattern. I explained that every group had a plate with two types of popsicle sticks: skinny and fat. Skinny popsicle sticks were for mixing the color and fat popsicle sticks were for scraping shaving cream off the print papers. Then I pressed my paper into the shaving cream, making sure to model that we don't need to press hard; just enough so that the color is touching all the paper. I pulled the paper off the shaving cream by lifting one corner, and then scraped off the excess with my fat popsicle stick back into the tray before setting my finished print on the drying sheet. I kept reinforcing the steps with questions about which tools to use and what to do so the students knew exactly what was expected of them. I think having these clear expectations helped students better follow directions and complete this project with little mess.
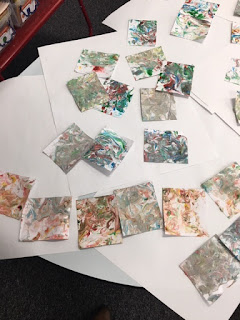
 After modeling, I had students return to their seats and write their names on their print sheets while I passed out the printmaking supplies. The students are seated in tables of six, so I had two groups (of 3 students) at each table working together. While passing out supplies, I had students talk to their group members about what 2-3 colors they wanted to mix together in their shaving cream. Once the supplies were distributed, we went through our steps to make sure we were on track. I had already spread the shaving cream out in each tray, so next was adding and mixing color. I reminded students to not move ahead to further steps until I instructed them to do so. I went around adding color drops to each tray and had students start swirling it in to make their marble patterns. When everyone was done, we moved on to pressing our papers into the tray (all three group members at the same time), pulling them up by one corner, scraping them off, and laying them to dry. We repeated our process once more so every students had two prints to add to their portfolios.
 Like I said before, I was really concerned with the mess that could come with this project, and so I was really worried about classroom management and that students might get carried away playing in the shaving cream. Something I discovered that really helped me was I gave the students something to do with their hands after they completed each step. For example, when groups were done mixing their color and had set their popsicle sticks back on their plates, I had them stick both hands in the air so I knew they were ready to move on. Before having them press their papers into the shaving cream, I had them hold up their print sheets and point to their name so I could make sure everyone was together. After they had set their prints to dry, I had them put their hands behind their back so they weren't tempted to keep playing in the shaving cream. This worked well with our project because the students had something to do in their downtime.
 Clean up was a bit messy- looking back I probably should have set up a procedure (like with the steps of the project) so the process would be more clear, but all in all these 2nd graders did a great job of making sure everything was put away properly and their desks were completely clean and ready for jumping back in to their vocab lesson. From our end of class discussion it was evident that they grasped the concept of printmaking and could accurately tell me what marble pattern is and looked like. I'm a big believer in learning by doing, and because I wanted to dedicate most of our lesson time to our actual project today, it turned into a learning by doing lesson that, in the end, I think was very successful. I'm looking forward to next week!


**I've posted a link to my lesson plan for this week under the 'Resources' page of this blog.
 We started by talking about the word 'marble'. Where have we heard it before? What does marble look like? How is it made? I showed some example of marble rock pattern and then some marbling pattern as recreated using different art mediums. I introduced the term "printmaking" and we discussed what it was. Printmaking is where you transfer pictures, patterns or designs from one place to another. For example, ink stamps are a type of printmaking because you are using the rubber stamp pattern and ink to transfer an image to a paper. I explained that today we will be creating our own marbling patterns using printmaking. Our method of printmaking is mixing food coloring into shaving cream and then transferring those patterns to small pieces of paper. We watched a short video that gave a quick example of what our project would look like.
Because I knew this project had the potential get super messy really quickly, I wanted to make sure to break up the process into steps that could be followed one at a time as a whole class. As we were watching the video in class, I realized we could even write our steps on the board so the students have a visual of what to follow. (This step isn't included in my lesson plan- it was a day-of accommodation!) I asked students to remember what they saw in the video and list the steps they completed the project in. The list we came up with was:
1. Spread out shaving cream.
2. Add color drops.
3. Mix color with shaving cream. (Not all the way!)
4. Press paper down. (& lift up by pulling ONE corner)
 5. Scrape extra shaving cream off (and back into the tray).
6. Set prints on the drying sheet.
Then, I had the students come up to the carpet to watch me model the project. This way, they could understand how we would follow the steps using the tools we had (which were a little different from that of the video). First I showed them the shaving cream tray, added drops to it, mixed the color in to make a marble pattern. I explained that every group had a plate with two types of popsicle sticks: skinny and fat. Skinny popsicle sticks were for mixing the color and fat popsicle sticks were for scraping shaving cream off the print papers. Then I pressed my paper into the shaving cream, making sure to model that we don't need to press hard; just enough so that the color is touching all the paper. I pulled the paper off the shaving cream by lifting one corner, and then scraped off the excess with my fat popsicle stick back into the tray before setting my finished print on the drying sheet. I kept reinforcing the steps with questions about which tools to use and what to do so the students knew exactly what was expected of them. I think having these clear expectations helped students better follow directions and complete this project with little mess.
 After modeling, I had students return to their seats and write their names on their print sheets while I passed out the printmaking supplies. The students are seated in tables of six, so I had two groups (of 3 students) at each table working together. While passing out supplies, I had students talk to their group members about what 2-3 colors they wanted to mix together in their shaving cream. Once the supplies were distributed, we went through our steps to make sure we were on track. I had already spread the shaving cream out in each tray, so next was adding and mixing color. I reminded students to not move ahead to further steps until I instructed them to do so. I went around adding color drops to each tray and had students start swirling it in to make their marble patterns. When everyone was done, we moved on to pressing our papers into the tray (all three group members at the same time), pulling them up by one corner, scraping them off, and laying them to dry. We repeated our process once more so every students had two prints to add to their portfolios.


**I've posted a link to my lesson plan for this week under the 'Resources' page of this blog.


Hi Madison,
ReplyDeleteWish I had been there. It looked like a really fun lesson!! From this report, which is very well written, it seems as though both the lesson and the procedure were well thought out. I'm glad you felt as though you learned something however. What you learn from a lesson is as important as what the 2nd graders learn. Keep up the good work!!!